DronaBlog

Friday, July 27, 2018

How to Soft Delete BULK Records using SIF - Delete API


Are you facing the issue in your organization about soft deleting the high volume of records in the Informatica MDM? Are you looking for the best possible way to soft delete this bulky volume of records? Are you looking for information about how to use the Services Integration Framework (SIF) – Delete API? This article examines the basic concept of SIF – Delete API and how to implement Java code for soft deleting records using SIF API. 

Business Use Case:


Assume that MDM implementation is completed and daily jobs are running well in production. However, on a particular day, the ETL team loaded the wrong set of data in the MDM landing tables which results in records going from landing to staging and from staging to Base Object. Now, bad data is present in the Base Object, Xref and history tables and your business would like to soft delete these records. These options below are available to resolve this problem:

a) Physically delete the records using ExecuteBatchDelete API.
b) The ETL team can soft delete the record and load in landing. It can then be processed using stage and load job.
c) Soft delete records using SIF Delete API.

Out of all these, option ‘Soft delete records using SIF Delete API’ is the easiest to implement to handle business needs.

What is SIF Delete API?


The SIF Delete API can delete a base object record and all its cross-reference (XREF) records. It can also be used to delete any specific XREF record. State of record in Base Object table will be reset when a XREF record is deleted and it is based on the higher precedence basis. The records undergo the following changes when records are deleted:
  • Records in the ACTIVE state are set to the DELETED state.
  • Records in the PENDING state are hard deleted.
  • Records in the DELETED state are retained in the DELETED state.

Sample API Request:


DeleteRequest request = new DeleteRequest();
RecordKey recordKey = new RecordKey();
recordKey.setSourceKey("4001");
recordKey.setSystemName("SRC1");
ArrayList recordKeys = new ArrayList();
recordKeys.add(recordKey);
request.setRecordKeys(recordKeys);
request.setSiperianObjectUid("PACKAGE.CUSTOMER_PUT");

DeleteResponse response = (DeleteResponsesipClient.process(request);

Response Processing:


The getDeleteResults() returns the list of RecordResult objects which contains all necessary information such as the record key with ROWID_XREF, PKEY_SRC_OBJECT, ROWID_SYSTEM etc which can be retrieved as below.

DeleteResponse response = new DeleteResponse();
for(Iterator iter=response.getDeleteResults().iterator();
iter.hasNext();)
{
  //iterate through response records
  RecordResult result = (RecordResult) iter.next();
  System.out.println("Record: " + result.getRecordKey());
  System.out.println(result.isSuccess()?"Success","Error");
  System.out.println("Message: " + result.getMessage());
}

Sample Code:


private void deleteRecord(List xrefIds) {
   try {
        List successRecord = new ArrayList();
        List failedRecord = new ArrayList();
        DeleteRequest request = new DeleteRequest();
        ArrayList recordKeys = new ArrayList();
        Iterator itrRowidXref = xrefIds.iterator();
        while (itrRowidXref.hasNext()) {
            Integer rowidXrefValue = (Integer) itrRowidXref.next();
            RecordKey recordKey = new RecordKey();
            recordKey.setRowidXref(rowidXrefValue.toString());
            recordKeys.add(recordKey);
        }
               
        request.setRecordKeys(recordKeys);
        request.setSiperianObjectUid("BASE_OBJECT.C_BO_CUST");
        AsynchronousOptions localAsynchronousOptions = new AsynchronousOptions(false);
        request.setAsynchronousOptions(localAsynchronousOptions);
        DeleteResponse response = (DeleteResponse) sipClient.process(request);
        if (response != null) {
            for (Iterator iter = response.getDeleteResults().iterator(); 
        iter.hasNext();) {
              RecordResult result = (RecordResult) iter.next();
              if (result.isSuccess()) {
            successRecord.add(result.getRecordKey().getRowidXref());
              } else {
            failedRecord.add(result.getRecordKey().getRowidXref());
                  }
              }
         }
          System.out.println("Failed Records : " + failedRecord);
           } catch (Exception e) {
                e.printStackTrace();
          
     }


Details about implementation are explained in this video:

Monday, July 23, 2018

Services Integration Framework – SIF – API – CleansePut


Purpose of the CleansePut API:

The CleansePut API is used to insert or update a record into a base or dependent child base object in a single request. It increases the performance by reducing the number of round trips between the client and the MDM Hub.

How does it work?

  • During the CleansePut processing all records go through the stage batch process and the load batch process in a single request. 
  • The data is transferred from a landing table to the staging table associated with a specific base object. 
  • During this transfer of data cleansing happens if cleansing is defined. 
  • The mapping created in the MDM hub has a link between the landing table and the staging table along with the data cleaning function. 
  • This mapping name is used to determine the landing and the staging table structure. 
  • After successful processing of the stage job, the load batch process will be started which transfers data from a staging table to the corresponding target table or the base object in the Hub Store. 
  • In order to determine a base object or dependent child table name, the staging table associated with the mapping is used. 
  • Even though data is processed through the stage batch, it does not use the landing and staging tables.

What is role of stage management during CleansePut request?

If state management is enabled then we can specify the initial state of the record in the HUB_STATE_IND column of the mapping. Valid values in the HUB_STATE_IND column:
  • 1 (ACTIVE)
  • 0 (PENDING)
  • -1 (DELETED)

Default value is 1 when you insert a new record. We cannot use the HUB_STATE_IND column of the mapping to specify the state change while updating the record.

Important points:

  1. Null values can be processed by both the PutRequest and CleansePut APIs. For example, if we do not specify a value for a request, null value will be set.
  2. For the non nullable column, do not insert a null value such as a unique key column.
  3. Values in the read only column cannot be updated or inserted by the CleansePut API.
  4. We can insert or update values in the system columns if the putable property is enabled.
  5. We can use the backslash (\) to escape special characters such as the single quotation mark (') or the tilde (~) in the CleansePut object.
  6. To filter the record we can use the Mappings tool in the Hub Console to include a filter criteria.
  7. The CleansePut API can use delta detection on the staging table. Data will be filtered if the input data does not differ from the existing data.

Methods


Method Name
Description
 getCleanseData
 Gets the cleansed record
 getGenerateSourceKey
 Gets the status that indicates whether to generate a source key
 getIsFillOnGap

 getPeriodReferenceDate

 getRecord
 Gets the record to update or insert into a base or dependent object
 getSiperianObjectUid
 Gets the unique ID for the record from SiperianObjectUidProvider.getSiperianObjectUid()
 getSystemName
 The name of the system
 getTimeLineAction

 setGenerateSourceKey(boolean generateSourceKey)
 Sets the status to indicate whether to generate a source key
 setIsFillOnGap(boolean isFillOnGap)

 setPeriodReferenceDate(Date periodReferenceDate)

 setRecord(Record record)
 Sets the record to update or insert into a base or dependent object
 setSystemName(String systemName)
 Sets the name of the system
 setTimeLineAction(int timeLineAction)


Java Sample Example

In the example below, the record with the ROWID_OBJECT = 1000 gets updated and it uses the Stage SRC1 Party mapping:

CleansePut  request = new CleansePut ();
Record record = new Record();
record.setSiperianObjectUid("MAPPING.Stage SRC1 Party");
record.setField( new Field("PARTY_ID", "1000") );
record.setField( new Field("FULL_NM", "Ross Paul") );
record.setField( new Field("TAXID", "123456") );
record.setField( new Field("LAST_UPDATE_DATE", new Date()) );
request.setRecord( record );
CleansePutResponse response = (CleansePutResponse) sipClient.process(request);

 This video below explains how to use Put API in Java -


Wednesday, July 18, 2018

How to delete records in Informatica MDM using SIF API


In this article we will learn about the process for deleting records in Ithe nformatica MDM Hub.

Pre-Requisite:

1.       In order to delete records we need to have SOAP UI installed in our system.
2.       Database client such as SQL Developer in order to verify records
3.       Server logs access in order to analyze logs in case any issue occurs

Sample Request:

Below is a sample request which can be used to delete record/records in the XREF and BO tables.

You can download the XML Request here.

<soapenv:Envelope xmlns:soapenv="http://schemas.xmlsoap.org/soap/envelope/" xmlns:urn="urn:siperian.api">
   <soapenv:Header/>
   <soapenv:Body>
      <urn:executeBatchDelete>
         <urn:username>xxxxx</urn:username>
         <urn:password>
            <urn:password>yyyyy</urn:password>
            <urn:encrypted>false</urn:encrypted>
         </urn:password>
         <urn:orsId>localhost-orcl102-CMX_ORS</urn:orsId>
         <urn:tableName>C_BO_PARTY</urn:tableName>
         <urn:sourceTableName>C_BO_PARTY_XREF_DEL</urn:sourceTableName>
         <urn:recalculateBvt>TRUE</urn:recalculateBvt>
         <urn:cascading>FALSE</urn:cascading>
         <urn:overrideHistory>FALSE</urn:overrideHistory>
         <urn:purgeHistory>FALSE</urn:purgeHistory>
      </urn:executeBatchDelete>
   </soapenv:Body>
</soapenv:Envelope>

Details about request:

Below are the components available in this request:
  • TableName : Base Object table name
  •  SourceTableName:  Name of the table that contains the list of cross-reference records to delete. This table should contain at least the ROWID_XREF column or the (PKEY_SRC_OBJECT and ROWID_SYSTEM columns)
  •  Cascading: Set to true to run a cascading batch delete
  • OverrideHistory:   
o   Determines if the MDM Hub records the activity performed by the batch delete in the history tables.
o   Set to true to record the history of the deleted records in the history table.
o   Set to false to ignore the value of PurgeHistory and to write the last state of the data into the history tables when the record is deleted.
  • ·         PurgeHistory:

o   Determines if the MDM Hub deletes all non-merge history records related to the deleted cross-reference record.
o   The deleted history records cannot be retrieved.
o   Set to true to delete the history records.
o   Set to false to retain the history records.


Thevideo below provides detailed information on how to delete records using the SOAP UI tool.


Tuesday, July 17, 2018

How to Clear the Java Web Start (javaws) cache on a local client machine

Are you looking for an article on how to clear the Java Web Start cache? This articles provides various ways by which you can clear the Java Web Start Cache.

Why clear the Java Cache?
Most of the time, the Java update occurs automatically so the system updates to the higher Java version. For security reasons, it is recommended to always maintain the most current stable higher Java version. Sometimes the higher version of Java is installed to support other applications. The Java cache is created for better performance of your Java application. So the Java cache will be out of sync when the Java upgrade happens. Due to this, the application will behave inconsistently. To avoid such inconsistent behavior of an application, we need to clear the Java Cache.

How to clear the cache?
There are three ways by which we can clear Java cache :
1. Using Java Configure Mode
2. Using command line
3. Manually deleting file

  1. Using Java Configure Mode -

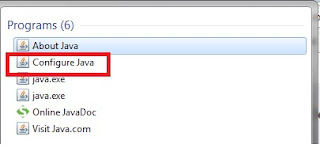
  • In this mode, if you are using windows system then go to Start -> Search function. Then type, Java. Several options will  popup. Select the Configure Java option from it.
  • Once you select, the Configure Java option and click on it, it will take us to the dialog box 'Java Control Panel'. In this dialog click on the 'Settings' tab.

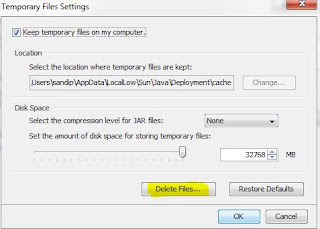
  • Once we click on 'the Settings' button, it will take us to another dialog box - 'Temporary Files Settings'. In this dialog box, click on Delete Files to delete the Java cache. 


2. Using Command Line Mode -

  • Open your computer's DOS prompt by selecting the Start menu followed by the Run option. 
  • Enter 'command' followed by pressing the Enter key.
  • Type javaws at the DOS prompt followed by the Enter key to see the Java Web Start command-line options.
  • Type javaws -Xclearcache followed by the Enter key to clear Java Web Start Cache on your computer. 
  • After the cache has been cleared, the local drive prompt will appear on the DOS prompt.

3. Manually Deleting Files -

  • Delete the cache folder located in C:\Users\<user>\AppData\LocalLow\Sun\Java\Deployment on Windows 7.
  • For other Operating System versions, you might have to do the delete operation in the appropriate Sun Java folder.

How to fix 'Could not initialize class ssa.ssaname3.jssan3cl' Error message


Are you searching for an article about how to fix the issue caused by class initialization? What is the reason for getting this error? This article provides detailed information on the root cause of the error and how to resolve it.

What is the root cause of the SSANAME3 initialization?
Informatica MDM has a process called Tokenization. During this process several repository or jar files are utilized. The files used in this process are libjssan3cl.so, libssaiok.so, libssalsn.so, libssan3tb.so, libssan3v2.so etc. If these files are not available to use then tokens will not be generated during the tokenization process. Tokens are important keys for the matching process. So, during the start of the tokenization process, first check whether these files are available at the required location or not. These files can be put at any location and loaded in classpath. However, these files are generally placed in the cleasne/lib location. This cleanse/lib path must be loaded in classpath. If we do not put these files in classpath then during the initialization process the error message below will appear.

[ERROR] com.siperian.mrm.match.tokenize.TokenizeWorker: caught OTHER Error
java.lang.NoClassDefFoundError: Could not initialize class ssa.ssaname3.jssan3cl
at ssa.ssaname3.N3Dll.<init>(N3Dll.java:53)
at com.siperian.mrm.match.SsaBase.loadAndOpenNM3(SsaBase.java:183)
at com.siperian.mrm.match.SsaBase.<init>(SsaBase.java:56)
at com.siperian.mrm.match.tokenize.TokenizeWorker.realRun(TokenizeWorker.java:151)
at com.siperian.mrm.util.threads.MatchThread.run(MatchThread.java:78)

How to fix this SSANAME3 initialization error?
In order to fix this error perform the tasks below.
        Set these variables in the setDomainEnv.sh or setDomainEnv.bat file present under the $WL_HOME/bin directory and restart the AppServer. For other application servers, be sure to set these variables in their corresponding startup scripts.

  • ·         For Linux, add Hub/Cleanse/Lib to the LD_LIBRARY_PATH and create an SSAPR Environment Variable.

LD_LIBRARY_PATH = <Hub_Cleanse_Install_Directory>/lib
SSAPR = <Hub_Cleanse_Installation_Directory>/resources
  • For Windows, add Hub/Cleanse/Lib to the PATH variable and create an SSAPR Environment Variable.
PATH = <Hub_Cleanse_Install_Directory>/lib
SSAPR = <Hub_Cleanse_Installation_Directory>/resources

The video below explains the SSA Name 3 process in detail.


Tuesday, July 10, 2018

Performing MDM Code migration


Are you looking for information about how to perform MDM code migration? If so, then read this article which provides brief information about code migration for the MDM hub, User Exits, Informatica Data Director, etc.

Click here for the code migration document.

1. MDM Initial Migration
  • The development team needs to complete all the development activities and to validate the ORS to ensure that there are no errors.
  • Below are the steps to export an ORS (with all the development objects) from the source ORS (Dev/QA).
a)      In the source environment, launch the MDM HUB and connect to the Master Database.
b)      Click on the ‘Repository Manager’ under the Configuration Workbench.
c)       Click on the ‘export’ tab and select the repository to export from the dropdown list and click on the export button (Save the icon at the extreme right).
d)      Save the ORS as the MDM<EnvName><Date>.Change.xml file to the disk.
  • Below are the steps to Import an ORS to target ORS (QA/Prod) for the initial migration.

a)      In the target environment, launch the MDM HUB and connect to the Master Database.
b)      Click on the ‘Repository Manager’ under the Configuration Workbench.
c)       Click on the ‘Import’ tab and then click the button beside the Source to select the source repository to be migrated and then click on the ‘File Repository’ tab.
d)      Choose the Target repository (which is blank for the initial migration) to which the code needs to be migrated and then click on the ‘Apply Changes’ icon.
e)      MDM prompts the roll back option in case of any issues encountered during the code migration. Select ‘Full rollback’ so that there won’t be any partial code migrated to the Target ORS.
f)      Once the changes are applied, there will be a prompt for an integrity check. Select ‘Yes’ for the prompt.
g)      It will take a while to implement the changes and gives the below prompt. Select ‘Ok’ for prompt.

2. MDM Incremental Migration
  • The development team must complete all the development activities for the selected objects, validate the ORS, and make sure there are no errors.
  • Refer to the above steps for exporting (backup) the source ORS and the target ORS to the Change.xml file.
  • Below are the steps to import an ORS to the target ORS (QA/Prod) for the incremental migration:
a)      In the target environment, launch the MDM HUB and connect to the Master Database.
b)      Click on the ‘Repository Manager’ under the Configuration Workbench.
c)     Click on the ‘Promote’ tab and then click on the ‘Visual’ tab. Next click the button beside ‘Source’ and click on the ‘File Repository’ tab to select the source Change.xml file generated in the step above. 
d)      It will load the change list and validation will be done automatically. It should show the status as ‘Valid’.
e)      Select the Target ORS from the dropdown into which the changes need to be migrated. It will be shown below the progress bar and will take a few minutes to load the ORS objects. Once loaded, the objects with changes from the source to the target are shown as ‘Refresh’ icons and the new objects are shown with a green dot.
f)   Select the changes to be promoted, right click and select Promote. The popup shows up below. Select the option ‘Use Source values as the final results for conflicts’ and click ‘OK’.
g)      Once the changes are listed, click on ‘Run a simulation of changes’ icon  (white play button). This will simulate the changes and throw out any errors/issues. This way the issues can be identified before actually applying the changes.
h)      Below the prompt will be shown. Select ‘Yes’.
i)      Once the simulation is done, click on the ‘Apply Changes’ icon  (Green Play button).
j)      MDM prompts for the roll back option in case of any issues encountered during the code migration. Select ‘Full rollback’ so that there won’t be any partial code migrated to the Target ORS.
i)      Repeat the above steps (from step f) to promote the changes for each component (like Cleanse function, mappings, BOs, etc.)


3. MDM User Exits Migration
                  The customizations required in the MDM HUB are implemented in the MDM user exit java code. Any changes in the jar file in Dev need to be migrated to QA and further environments.  Below are the steps to migrate the user exit in the MDM HUB.
  • Connect to the MDM HUB in the target environment. Click on the ‘User Object Registry’ under the ‘Utilities’ Workbench.
  • Click on ‘User Exists’. Only one jar file can be uploaded as the MDM user exit.

a)      If the jar is being added for the first time, click on the plus (+) icon and add the jar file. 
b)    If the existing jar file needs to be updated, click on pencil ico , and the popup appears below. Browse the location of the jar file and click on ‘OK’. It will refresh in a few seconds and the latest jar file should upload to the MDM HUB.
4. IDD Code Migration
Follow the steps below to create a new IDD application for doing the initial code migration:
1)      Take the export from the source IDD application as shown in the screenshot below and save the zip file to the disk.
2)      Launch the target system’s IDD url and login with a user with required privileges.
3)      Click on the ‘Add’ button at the top and fill in the required details as below.
4)      Once the application is created, select the application and hover over the import button to see the dropdown of the options. Select the ‘Import complete IDD application (Zip)’ and browse the zip file from the source. 
5)      Bind the ORS and hover over the ‘Application State’ button and select the ‘Full Deployment’ option. It will take a few minutes to deploy the application. Once done, the application status should be valid (green check mark under the status column). 

5. Code Migration Issues
1)      Package Migration Issues:
a)      Custom queries have to be migrated manually by copying the query from the Source to the Target. However, new custom queries can be migrated from the Repository Manager.
b)      If any columns are removed from the non-custom query, those columns have to be removed manually from the Target system by directly going to the query under the package.

2)      BO Migration:
a)      The column in the target system needs to be deleted if any of the following occurs: any columns are removed from the BO, the data type is changed, the length is decreased, or the display name is changed. Follow the steps below in the Target system before deleting the column.
·         Check the impact analysis and identify the dependent objects such as Packages and Child Tables.
·         Remove the field from all the Packages where the particular field is referred.
·         Remove the column from the child table.
·         Once the field is removed from all the dependent objects, then remove the columns from BO.
·         Migrate the column from the Source to the Target system from the Repository Manager.


3)      SAM Migration:
Once the SAM access for an existing role is migrated from the source to the target system, check the SAM access by querying the database. Below is a sample query:

select 'QA' ENV,sysdate CREATE_DATE, B.ROLE_NAME,C.SIPERIAN_OBJECT_UID,A.PRIVILEGE_CREATE_IND CREATE1,
A.PRIVILEGE_READ_IND READ1, A.PRIVILEGE_UPDATE_IND UPDATE1,
A.PRIVILEGE_DELETE_IND DELETE1,A.PRIVILEGE_EXECUTE_IND EXECUTE1
from cmx_ors_dev2.C_REPOS_SAM_ROLE_PRIVS A,cmx_ors_dev2.c_repos_sam_role B,
cmx_ors_dev2.C_REPOS_SAM_RESOURCE C
where A.rowid_sam_role=B.rowid_sam_role
AND A.rowid_sam_resource=C.rowid_sam_resource

4)      Hierarchy Migration:
If a new hierarchy is created on the existing BO, then the BO needs to be truncated to migrate from the source to the target.


5)      Securing the Resources:
If any new code objects are migrated to the Target system, make sure to verify that these objects are secure from the SAM tool in the MDM HUB by applying the filter below.
The screenshot below shows the secure resources and the checking for any Private resources.

Understanding Survivorship in Informatica IDMC - Customer 360 SaaS

  In Informatica IDMC - Customer 360 SaaS, survivorship is a critical concept that determines which data from multiple sources should be ret...