Step 1: Locate the installer file, received from the Informatica Support team. In the Windows system, it will be .exe file. Double click on the .exe file. The dialog window will appear as shown in the screen below. Read the agreement and select the radio button corresponding to 'I accept the terms of the License Agreement' and then click on the 'Next' button.
Step 2: Select the file system location on the Windows System where you would like to install the Informatica MDM product. You can browse the location using the 'Choose' button. After providing the location click on the 'Next' button.
Step 3: If you would like to create a short cut for the MDM Hub on the Desktop or in the Start Menu then choose the shortcut folder location. Click on the 'Next' button after choosing the shortcut folder option.
Step 4: When you buy the Informatica product from Informatica, it comes with the license file. You can browse the license file using 'Choose' button and then click on the 'Next' button.
Step 5: The next step is important. If you are using the Weblogic application server then select the radio button corresponding to the 'Weblogic' option or else select the other based on the application server you are using in your environment. After it, click on the 'Next' button.
Step 6: The next step will ask to provide the application server home location. You can provide the path or browse the application server home location by using 'Choose' button. After providing the home path, click on the 'Next' button.
Step 7: If you are using the Weblogic application server then the dialog window mentioned below will appear to provide the Weblogic application server details. You need to provide the host name (it is the server name on which the weblogic server is installed), Server name, Weblogic user name, Weblogic user password and listen port on which the weblogic server is listening. You can get the information from your middleware (application server installation) team. In the screen shot below, the sample values are provided. After providing the server details, click on the 'Next' button.
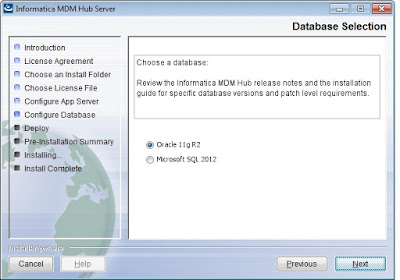
Step 8: After providing the details about the application server, the next step is to provide the database details. If you are using the Oracle database then select the radio button corresponding to 'Oracle 11g R2' or the respective database version (If you are using a higher version of MDM then the database version option will be different). Click on the 'Next' button.
Step 9: Based on the database setup, if you can select the database Service Name or the database SID (Oracle System Id). You can get the Service Name or the SID name from your DBA. Click on the 'Next' button.
Step 10: If you are using the Oracle database then the dialog window mentioned below will appear to provide the Oracle database details. You need to provide the Server (it is the name of the server on which the Oracle database is installed), Port on which the database is listening, Service name, System Schema name and System Schema password. You can get the information from your DBA team. In the screen shot below, the sample values are provided. After providing the database details, click on the 'Next' button.
Step 11: The next dialog window will show connect url. You can verify connect url. If you would like to make any changes in connect url then select the radio button corresponding to 'Yes' or else select the radio button corresponding to 'No' option. After selecting the appropriate option click on the 'Next' button.
Step 12: After the installation of the MDM product we need to run the post install script. It can be done in two ways: We can run the post install script
1) immediately after running the installation file or
2) manually after the installation is done.
If you would like to run the post install script immediately after the installation is done then select the radio button corresponding to the 'Yes' option. After the appropriate option selection click on the 'Next' button.
Step 13: After providing all necessary information, the pre-installation summary will be provided as shown in the screen shot below. It shows the Product Name, the Install Folder, the Shortcut location, the Application server details and the database details.
Step 14: The pre-installation summary also provides more information as shown in the screen shot below. It shows the required disk space as well as the available disk space. If everything looks good then click on the 'Install' button.
Step 15: The installation will start and the progress bar will show the progress of installation. The screen shot below provides the details about progress with the steps of execution.
Step 16: Finally, the installation will be completed and the successful message will appear on the screen.
With the help of these steps, you will be able to install the MDM software successfully. Refer to the video below to learn the Informatica MDM product.


No comments:
Post a Comment
Please do not enter any spam link in the comment box.